Tuesday, December 6, 2011

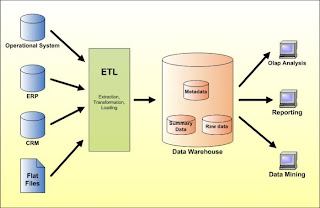
Data Warehouse Architecture


The above Architecture is taken from the www.databaseanswers.com . We would recommend you to visit this site to get good understanding towards data modeling.

Now we are goanna define each and every terminology in the above picture to facilitate better understanding of the subject.

1. Operational Data Store : is a database designed to integrate data from multiple sources for additional operations on the data. The data is then passed back to operational systems for further operations and to the data warehouse for reporting.

2. ERP : Enterprise resource planning integrates internal and external management information across an entire organization, embracing finance/accounting, manufacturing, sales and service, etc.

Its purpose is to facilitate the flow of information between all business functions inside the boundaries of the organization and manage the connections to outside stakeholders.

3. CRM : Customer relationship management is a widely-implemented strategy for managing a company’s interactions with customers, clients and sales prospects. It involves using technology to organize, automate, and synchronize business processes—principally sales activities, but also those for marketing, customer service, and technical support.

Customer relationship management describes a company-wide business strategy including customer-interface departments as well as other departments.

4. Flat Files In data Ware Housing : Flat Files Doesn’t Maintain referential Integrity like RDBMS and are Usually seperated by some delimiters like comma and pipes etcs.

Right from Informatica 8.6 unstructured data sources like Ms-word,Email and Pdf can be taken as source.

5. ETL (Extract,Transform, And load) :

is a process in database usage and especially in data warehousing that involves:

Extracting data from outside sources

Transforming it to fit operational needs (which can include quality levels)

Loading it into the end target (database or data warehouse)

6. Data Marts: A data mart (DM) is the access layer of the data warehouse (DW) environment that is used to get data out to the users. The DM is a subset of the DW, usually oriented to a specific business line or team.

For the Definition of the Data Warehouse Please Refer to Introduction to the Data ware Housing.

7. OLAP : OLAP (Online Analytical Processing) is a methodology to provide end users with access to large amounts of data in an intuitive and rapid manner to assist with deductions based on investigative reasoning.

OLAP systems need to:

1. Support the complex analysis requirements of decision-makers,

2. Analyze the data from a number of different perspectives (business dimensions), and

3. Support complex analyses against large input (atomic-level) data sets.

8. OLTP : Online transaction processing, or OLTP, refers to a class of systems that facilitate and manage transaction-oriented applications, typically for data entry and retrieval transaction processing.

9. Data Mining: Is the process of extracting patterns from large data sets by combining methods from statistics and artificial intelligence with database management. Data mining is seen as an increasingly important tool by modern business to transform data into business intelligence giving an informational advantage.

Introduction to Data warehousing

A data warehouse (DW) is a database used for reporting. The data is offloaded from the operational systems for reporting. The data may pass through an operational data store for additional operations before it is used in the DW for reporting.

A data warehouse maintains its functions in three layers: staging, integration, and access. Staging is used to store raw data for use by developers (analysis and support). The integration layer is used to integrate data and to have a level of abstraction from users. The access layer is for getting data out for users.

1. Ralph Kimball's paradigm: Data warehouse is the conglomerate of all data marts within the enterprise. Information is always stored in the dimensional model.

Definition as Per Ralph Kimball : A data warehouse is a copy of transaction data specifically structured for query and analysis.

His Approach towards towards the Data warehouse Design is Bottom-Up.In the bottom-up approach data marts are first created to provide reporting and analytical capabilities for specific business processes

2.Bill Inmon's paradigm: Data warehouse is one part of the overall business intelligence system. An enterprise has one data warehouse, and data marts source their information from the data warehouse. In the data warehouse, information is stored in 3rd normal form.

Definition as Per Bill Inmon:

A data warehouse is a subject-oriented, integrated, time-variant and non-volatile collection of data in support of management's decision making process.

Subject-Oriented: A data warehouse can be used to analyze a particular subject area. For example, "sales" can be a particular subject.

Integrated: A data warehouse integrates data from multiple data sources. For example, source A and source B may have different ways of identifying a product, but in a data warehouse, there will be only a single way of identifying a product.

Time-Variant: Historical data is kept in a data warehouse. For example, one can retrieve data from 3 months, 6 months, 12 months, or even older data from a data warehouse. This contrasts with a transactions system, where often only the most recent data is kept. For example, a transaction system may hold the most recent address of a customer, where a data warehouse can hold all addresses associated with a customer.

Non-volatile: Once data is in the data warehouse, it will not change. So, historical data in a data warehouse should never be altered.

His Approach towards towards the Data warehouse Design is Top-Down. In top-down approach to data warehouse design, in which the data warehouse is designed using a normalized enterprise data model. "Atomic" data, that is, data at the lowest level of detail, are stored in the data warehouse.

Tuesday, November 22, 2011

New Tatkal ticket rules come into effect


New Delhi: Indian Railways’ new ticket booking rules under the Tatkal Sewa will come into force from Monday.

Under the new rule, advance reservation period of Tatkal tickets has been reduced from two days to one day (24 hours).

The advance Reservation Period of Tatkal Scheme is reduced from two days to one day excluding the day of journey from the originating station from Monday.

For example, if a train is to depart from the originating station on 2nd day of the month then the Tatkal quota for this particular train will open at 08.00hrs of the 1st day of the month.


A maximum of FOUR passengers can be booked per PNR for Tatkal tickets.Now, no refund will be granted on cancellation of confirmed Tatkal tickets except in exceptional circumstances. Also, no duplicate tickets will be issued except only in exceptional cases on payment of full fare including Tatkal charges.


Tatkal tickets shall be issued only on production of prescribed photo identity card. For this purpose, a self attested photo copy of the proof of identity of any one passenger is required to be attached to the requisition slip.

During the journey, the passenger whose identity card number has been indicated on the ticket will have to produce original proof of identity indicated on the ticket. If the passenger whose identity card number is indicated on the ticket is not traveling, all other passengers booked on that ticket will be treated as travelling without ticket and charged accordingly.

Agents/RTSAs will not be able to book Tatkal tickets at the counters as well as on the internet between 08.00hrs to 10.00hrs.The IRCTC agents will be permitted to book only one Tatkal ticket per train per day on the internet

Saturday, November 19, 2011

Why do we Use Shell Scripting

We use Shell Scripts to obtain the following purposes:

1. Customizing your work environment.
2. Automating Your Daily Task.
3.Automating Repetitive Task.
4.Executing Important Procedures like shutting down the system,formatting a disk,Creating a file system on it,mounting the file system,letting the users use the floppy and finally un mounting the disk.
5.Performing the same operation on many files.

When Not to use Shell Scripting :

1. Is too complex,such as writing an entire billing system.
2. Requires a high degree of efficiency
3. Requires a variety of Software tools.

Usage of Shell Scripts with in Informatica:

1.To run an batch via pmcmd.
2. To have header and footer in case we are goanna write to an flat file
3.To run the command task.
4. To update parameter file with session start time and end time

Friday, November 18, 2011

IDENTIFICATION OF BOTTLENECKS

Performance of Informatica is dependant on the performance of its several components like database, network, transformations, mappings, sessions etc. To tune the performance of Informatica, we have to identify the bottleneck first.

Bottleneck may be present in source, target, transformations, mapping, session,database or network. It is best to identify performance issue in components in the order source, target, transformations, mapping and session. After identifying the bottleneck, apply the tuning mechanisms in whichever way they are applicable to the project.

Identify bottleneck in Source:
If source is a relational table, put a filter transformation in the mapping, just after source qualifier; make the condition of filter to FALSE. So all records will be filtered off and none will proceed to other parts of the mapping.In original case, without the test filter, total time taken is as follows:-
Total Time = time taken by (source + transformations + target load)
Now because of filter, Total Time = time taken by source
So if source was fine, then in the latter case, session should take less time. Still if the session takes near equal time as former case, then there is a source bottleneck.

Identify bottleneck in Target:
If the target is a relational table, then substitute it with a flat file and run the session. If the time taken now is very much less than the time taken for the session to load to table, then the target table is the bottleneck.

Identify bottleneck in Transformation:
Remove the transformation from the mapping and run it. Note the time taken.Then put the transformation back and run the mapping again. If the time taken now is significantly more than previous time, then the transformation is the bottleneck.
But removal of transformation for testing can be a pain for the developer since that might require further changes for the session to get into the ‘working mode’.
So we can put filter with the FALSE condition just after the transformation and run the session. If the session run takes equal time with and without this test filter,then transformation is the bottleneck.

Necessity Of Performance-Tuning

Performance Tuning Overview

The goal of performance tuning is to optimize session performance by eliminating performance bottlenecks. To tune session performance, first identify a performance bottleneck, eliminate it, and then identify the next performance bottleneck until you are satisfied with the session performance. You can use the test load option to run sessions when you tune session performance.

If you tune all the bottlenecks, you can further optimize session performance by increasing the number of pipeline partitions in the session. Adding partitions can improve performance by utilizing more of the system hardware while processing the session.

Because determining the best way to improve performance can be complex, change one variable at a time, and time the session both before and after the change. If session performance does not improve, you might want to return to the original configuration.
Complete the following tasks to improve session performance:

PUSH DOWN OPTIMISATION

You can push transformation logic to the source or target database using pushdown optimization. When you run a session configured for pushdown optimization, the Integration Service translates the transformation logic into SQL queries and sends the SQL queries to the database. The source or target database executes the SQL queries to process the transformations.

The amount of transformation logic you can push to the database depends on the database, transformation logic, and mapping and session configuration. The Integration Service processes all transformation logic that it cannot push to a database.

Use the Pushdown Optimization Viewer to preview the SQL statements and mapping logic that the Integration Service can push to the source or target database. You can also use the Pushdown Optimization Viewer to view the messages related to pushdown optimization.

The following figure shows a mapping containing transformation logic that can be pushed to the source database:

This mapping contains an Expression transformation that creates an item ID based on the store number 5419 and the item ID from the source. To push the transformation logic to the database, the Integration Service generates the following SQL statement:

PERFORMANCE TUNING OF LOOKUP TRANSFORMATIONS

Lookup transformations are used to lookup a set of values in another table.Lookups slows down the performance.

1. To improve performance, cache the lookup tables. Informatica can cache all the lookup and reference tables; this makes operations run very fast. (Meaning of cache is given in point 2 of this section and the procedure for determining the optimum cache size is given at the end of this document.)

2. Even after caching, the performance can be further improved by minimizing the size of the lookup cache. Reduce the number of cached rows by using a sql override with a restriction.

Cache: Cache stores data in memory so that Informatica does not have to read the table each time it is referenced. This reduces the time taken by the process to a large extent. Cache is automatically generated by Informatica depending on the marked lookup ports or by a user defined sql query.
Example for caching by a user defined query: -
Suppose we need to lookup records where employee_id=eno.
‘employee_id’ is from the lookup table, EMPLOYEE_TABLE and ‘eno’ is the
input that comes from the from the source table, SUPPORT_TABLE.
We put the following sql query override in Lookup Transform
select employee_id from EMPLOYEE_TABLE
If there are 50,000 employee_id, then size of the lookup cache will be 50,000.
Instead of the above query, we put the following:-
select emp employee_id from EMPLOYEE_TABLE e, SUPPORT_TABLE s
where e. employee_id=s.eno’
If there are 1000 eno, then the size of the lookup cache will be only 1000.But here the performance gain will happen only if the number of records in SUPPORT_TABLE is not huge. Our concern is to make the size of the cache as less as possible.

Optimizing the Bottleneck’s

  1. If the source is a flat file, ensure that the flat file is local to the Informatica server. If source is a relational table, then try not to use synonyms or aliases.
  2. If the source is a flat file, reduce the number of bytes (By default it is 1024 bytes per line) the Informatica reads per line. If we do this, we can decrease the Line Sequential Buffer Length setting of the session properties.
  3. If possible, give a conditional query in the source qualifier so that the records are filtered off as soon as possible in the process.
  4. In the source qualifier, if the query has ORDER BY or GROUP BY, then create an index on the source table and order by the index field of the source table.
PERFORMANCE TUNING OF TARGETS
If the target is a flat file, ensure that the flat file is local to the Informatica server. If target is a relational table, then try not to use synonyms or aliases.
  1. Use bulk load whenever possible.
  2. Increase the commit level.
  3. Drop constraints and indexes of the table before loading.
PERFORMANCE TUNING OF MAPPINGS
Mapping helps to channel the flow of data from source to target with all the transformations in between. Mapping is the skeleton of Informatica loading process.
  1. Avoid executing major sql queries from mapplets or mappings.
  2. Use optimized queries when we are using them.
  3. Reduce the number of transformations in the mapping. Active transformations like rank, joiner, filter, aggregator etc should be used as less as possible.
  4. Remove all the unnecessary links between the transformations from mapping.
  5. If a single mapping contains many targets, then dividing them into separate mappings can improve performance.
  6. If we need to use a single source more than once in a mapping, then keep only one source and source qualifier in the mapping. Then create different data flows as required into different targets or same target.
  7. If a session joins many source tables in one source qualifier, then an optimizing query will improve performance.
  8. In the sql query that Informatica generates, ORDERBY will be present. Remove the ORDER BY clause if not needed or at least reduce the number of column names in that list. For better performance it is best to order by the index field of that table.
  9. Combine the mappings that use same set of source data.
  10. On a mapping, field with the same information should be given the same type and length throughout the mapping. Otherwise time will be spent on field conversions.
  11. Instead of doing complex calculation in query, use an expression transformer and do the calculation in the mapping.
  12. If data is passing through multiple staging areas, removing the staging area will increase performance.
  13. Stored procedures reduce performance. Try to keep the stored procedures simple in the mappings.
  14. Unnecessary data type conversions should be avoided since the data type conversions impact performance.
  15. Transformation errors result in performance degradation. Try running the mapping after removing all transformations. If it is taking significantly less time than with the transformations, then we have to fine-tune the transformation.
  16. Keep database interactions as less as possible.

Wednesday, November 16, 2011

WORKING WITH TASKS –Part 1

The Workflow Manager contains many types of tasks to help you build workflows and worklets. We can create reusable tasks in the Task Developer.
Types of tasks:
Task Type
Tool where task can be created
Reusable or not
Session
Task Developer
Yes
Email
Workflow Designer
Yes
Command
Worklet Designer
Yes
Event-Raise
Workflow Designer
No
Event-Wait
Worklet Designer
No
Timer

No
Decision

No
Assignment

No
Control

No

SESSION TASK
  • A session is a set of instructions that tells the Power Center Server how and when to move data from sources to targets.
  • To run a session, we must first create a workflow to contain the Session task.
  • We can run as many sessions in a workflow as we need. We can run the Session tasks sequentially or concurrently, depending on our needs.
  • The Power Center Server creates several files and in-memory caches depending on the transformations and options used in the session.
EMAIL TASK
  • The Workflow Manager provides an Email task that allows us to send email during a workflow.
  • Created by Administrator usually and we just drag and use it in our mapping.
Steps:
  1. In the Task Developer or Workflow Designer, choose Tasks-Create.
  2. Select an Email task and enter a name for the task. Click Create.
  3. Click Done.
  4. Double-click the Email task in the workspace. The Edit Tasks dialog box appears.
  5. Click the Properties tab.
  6. Enter the fully qualified email address of the mail recipient in the Email User Name field.
  7. Enter the subject of the email in the Email Subject field. Or, you can leave this field blank.
  8. Click the Open button in the Email Text field to open the Email Editor.
  9. Click OK twice to save your changes.
Example: To send an email when a session completes:
Steps:
  1. Create a workflow wf_sample_email
  2. Drag any session task to workspace.
  3. Edit Session task and go to Components tab.
  4. See On Success Email Option there and configure it.
  5. In Type select reusable or Non-reusable.
  6. In Value, select the email task to be used.
  7. Click Apply -> Ok.
  8. Validate workflow and Repository -> Save
  • We can also drag the email task and use as per need.
  • We can set the option to send email on success or failure in components tab of a session task.
COMMAND TASK
The Command task allows us to specify one or more shell commands in UNIX or DOS commands in Windows to run during the workflow.
For example, we can specify shell commands in the Command task to delete reject files, copy a file, or archive target files.
Ways of using command task:
1. Standalone Command task: We can use a Command task anywhere in the workflow or worklet to run shell commands.
2. Pre- and post-session shell command: We can call a Command task as the pre- or post-session shell command for a Session task. This is done in COMPONENTS TAB of a session. We can run it in Pre-Session Command or Post Session Success Command or Post Session Failure Command. Select the Value and Type option as we did in Email task.
Example: to copy a file sample.txt from D drive to E.
Command: COPY D:\sample.txt E:\ in windows
Steps for creating command task:
  1. In the Task Developer or Workflow Designer, choose Tasks-Create.
  2. Select Command Task for the task type.
  3. Enter a name for the Command task. Click Create. Then click done.
  4. Double-click the Command task. Go to commands tab.
  5. In the Commands tab, click the Add button to add a command.
  6. In the Name field, enter a name for the new command.
  7. In the Command field, click the Edit button to open the Command Editor.
  8. Enter only one command in the Command Editor.
  9. Click OK to close the Command Editor.
  10. Repeat steps 5-9 to add more commands in the task.
  11. Click OK.
Steps to create the workflow using command task:
  1. Create a task using the above steps to copy a file in Task Developer.
  2. Open Workflow Designer. Workflow -> Create -> Give name and click ok.
  3. Start is displayed. Drag session say s_m_Filter_example and command task.
  4. Link Start to Session task and Session to Command Task.
  5. Double click link between Session and Command and give condition in editor as
  6. $S_M_FILTER_EXAMPLE.Status=SUCCEEDED
  7. Workflow-> Validate
  8. Repository –> Save

WORKING WITH EVENT TASKS
We can define events in the workflow to specify the sequence of task execution.
Types of Events:
  • Pre-defined event: A pre-defined event is a file-watch event. This event Waits for a specified file to arrive at a given location.
  • User-defined event: A user-defined event is a sequence of tasks in the Workflow. We create events and then raise them as per need.
Steps for creating User Defined Event:
  1. Open any workflow where we want to create an event.
  2. Click Workflow-> Edit -> Events tab.
  3. Click to Add button to add events and give the names as per need.
  4. Click Apply -> Ok. Validate the workflow and Save it.
Types of Events Tasks:
  • EVENT RAISE: Event-Raise task represents a user-defined event. We use this task to raise a user defined event.
  • EVENT WAIT: Event-Wait task waits for a file watcher event or user defined event to occur before executing the next session in the workflow.
Example1: Use an event wait task and make sure that session s_filter_example runs when abc.txt file is present in D:\FILES folder.
Steps for creating workflow:
  1. Workflow -> Create -> Give name wf_event_wait_file_watch -> Click ok.
  2. Task -> Create -> Select Event Wait. Give name. Click create and done.
  3. Link Start to Event Wait task.
  4. Drag s_filter_example to workspace and link it to event wait task.
  5. Right click on event wait task and click EDIT -> EVENTS tab.
  6. Select Pre Defined option there. In the blank space, give directory and filename to watch. Example: D:\FILES\abc.tct
  7. Workflow validate and Repository Save.

Example 2: Raise a user defined event when session s_m_filter_example succeeds. Capture this event in event wait task and run session S_M_TOTAL_SAL_EXAMPLE
Steps for creating workflow:
  1. Workflow -> Create -> Give name wf_event_wait_event_raise -> Click ok.
  2. Workflow -> Edit -> Events Tab and add events EVENT1 there.
  3. Drag s_m_filter_example and link it to START task.
  4. Click Tasks -> Create -> Select EVENT RAISE from list. Give name
  5. ER_Example. Click Create and then done.Link ER_Example to s_m_filter_example.
  6. Right click ER_Example -> EDIT -> Properties Tab -> Open Value for User Defined Event and Select EVENT1 from the list displayed. Apply -> OK.
  7. Click link between ER_Example and s_m_filter_example and give the condition $S_M_FILTER_EXAMPLE.Status=SUCCEEDED
  8. Click Tasks -> Create -> Select EVENT WAIT from list. Give name EW_WAIT. Click Create and then done.
  9. Link EW_WAIT to START task.
  10. Right click EW_WAIT -> EDIT-> EVENTS tab.
  11. Select User Defined there. Select the Event1 by clicking Browse Events button.
  12. Apply -> OK.
  13. Drag S_M_TOTAL_SAL_EXAMPLE and link it to EW_WAIT.
  14. Mapping -> Validate
  15. Repository -> Save.
  16. Run workflow and see.


Related Posts Plugin for WordPress, Blogger...